The French ormolu mantel clock, production and technique in the 18th and 19th Century.
 This article is based on a part of a lecture held in September 2017 here in our gallery in Amsterdam. In it the production process of the French ormolu mantel clock will be explained and which workmen were responsible for the result. A short literature list is stated below.
I have chosen the French gilt bronze mantel clock, because I wanted to limit the subject. The ‘fire gilding’ is a procedure in which gold is dissolved into mercury. After applying the mixture the object is heated. The heating causes the mercury to evaporate leaving the gold on the object. The result is often referred to as ormolu (or molu) which means milled gold. A more detailed description of the procedure is below.
The clock maker.
One might think that a mantel clock was the result of the work of one person, probably the clock maker. But it was in fact the result of the work of a number of masters. These masters included bronze casters, gilders and designers. Of course the clock maker was responsible for the the movement but even that wasn’t just made by one person only. Already early in the 18th Century there were specialists responsible for certain parts like main springs, hands and dials. Around the middle of the 18th Century it became more common that even the movements were supplied partly made. These blanc roulants or ebauches had to be finished. Many parts still needed to be polished, the escapement and the dial work had to be fitted. The cutting of the movement plates, wheels etc all was done by lower trained workmen. Who either worked from their home or in workshops. Frédéric Japy was trained as clock maker and already supplied half finished movements to clock makers from around 1770. In the process he used other workmen, working from home, to provide parts. After having designed machines for cutting and polishing clock parts which could now be made faster and cheaper, he opened a factory in Badeval in the Jura in 1779. His production line was so successful that the company opened up a number of other factories lead by his sons. So the large company named Japy frères originated. (Allix & Bonnert, Carriage clocks pp. 129 – 149)
To make designing easier, the French movement from the mid 18th Century on often are annular of form, fitting behind the dial. In this way the designer of a clock case didn’t need to take the movement into account. The annular shaped movements also made it easier for the different disciplines to work together.
Altogether the work of the clock maker was actually small comparing to the other craftsmen working on these mantel clocks. This also shows in the percentage he received of the amount paid for these clocks. The designer would earn about 10% of the total amount paid for the clock, the bronze caster would receive 20%, the chiseler 30%, the gilder 30% which would leave a mere 5-10% for the clock maker. His share would relatively be smaller when the clock was larger.
The production of the gilt bronze clock case.
We can conclude that most of the work for producing these ormolu mantel clocks was done by the makers of the case, which was proved by the portion that they received of the total amount paid for the clock.
It is remarkable that the masters were members of sometimes six different guilds. Therefore it isn’t a surprise that the first large ormolu pieces (clocks, candelabra etc) were made in the workshops around the court where the restrictions of guilds were applicable. Many complaints and court cases are known about masters employing workmen from other guilds. It was only until 1776 when a new guild for bronze casters and gilders was created.
The division between the guilds was probably also the reason why large gilt bronze objects weren’t produced for a long time. (from circa 1730 – 1740). This division can also explain why there aren’t many places outside Paris where large ormolu pieces were produced. The exceptions are the courts of Turin and Munich, and the workshop of Michael Boulton in England.
 The designer.
Of course first a design had to be made of the mantel clock. Sometimes this was done by the bronze caster (bronzier). But most of the times it was done it was done by interior designers, sculptors and artists. Quite a few drawings have survived showing the designs of mantel clocks. Many of them were deposited at the Paris library to make a sort of copy right possible.
The caster (Bronzier)
The two dimensional design had to be translated to a three dimensional model in wood, wax or clay (bozetto). From this model, the separate parts were modeled and pouring channels added. After that these parts were put into wooden crates with sand mixed with bone glue. In this way a mold was made. The molten bronze was cast into the mold, melting the wax and filling the left cavities. Thus forming the part in bronze with the pouring channels left on to them. The mold was removed. When copying a certain part, these parts were used because the pouring channels were still on them.
 Here we see a print showing the wooden boxes that were used to make the molds in. The wax models were pushed into the sand mixed with bone glue. The boxes were fixed together so the casting channels connected and the cast bronze would go through all the boxes. The molten wax would poor out at the bottom.
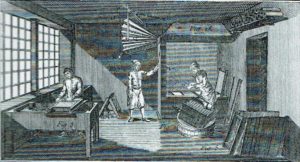 Here is a print depicting a bronze caster’s workshop. We clearly see the large bellows to heat up the fire. Further there are unit of boxes fixed together in which the molten bronze is poured. At the side there are further wooden boxes ready for use.
 Here is a picture of a cast sculpture coming straight from the mold with the pouring channels still on it.
The chaser (ciseleur)
The chaser is actually a sort of sculptor. Not only does he remove the casting channels. With chiseling, filing and sanding he removes all the imperfections left after the casting and brings out the right form. He also adds all the details that can’t be accomplished by just casting. Details like i.e. fingernails, eye lids and hair have to be made after the casting. Furthermore was he able to make different surface textures (representing i.e. hair, fabric, skin) which of course is important to make a sculpture look more real and lively.
It is therefore not surprising that the difference in quality has a lot to do with the skill of the chaser. It is also the reason why there are differences in quality between executions of the same model.
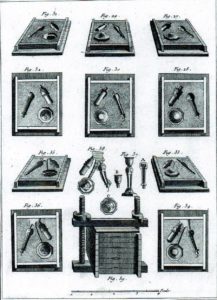
Here is a print showing tools of a chaser.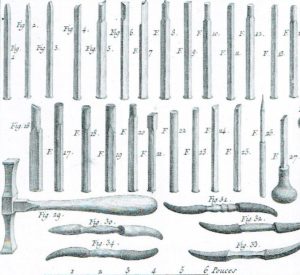
The gilder.
After the chiseling the object went to the gilder. A chaser would fix the object during his work with pitch. This needed to be removed. This was done by heating the object which also burned other dirt or grease. Another important thing happened during this heating. The object would oxidize. Bronze is an alloy of mainly copper with pewter and some zinc. During the oxidation the lesser metals would oxidize most. When the oxidation was removed, a copper-rich surface would remain. The copper-rich surface was better for the gold to attach to the alloy.
The removing of the oxidation was done by sanding up until about 1780. This meant that past of the chaser’s work was undone by this sanding. This could be the reason why the detailing of earlier Louis XVI pieces is more full of shape (plastic) than later. After the invention of nitric acid the oxidation could be removed chemically which did not temper with the chaser’s work.
Amalgam
Amalgam is gold dissolved in mercury. When heating mercury one can dissolve gold leaf or gold pallets in mercury in a ration of 1:8. At 300 degrees C the gold is fully dissolved. After that the solution is poured in water to cool and clean it. While doing that a chemical phase originates with the gold chemically connecting with the mercury. This connection is rich in gold (40 -50%) and can be separated from from the rest by squeezing it through a shammy. The silver colored residue is a paste called amalgam.
The amalgam is applied to the bronze by a soft brush. After that the object goes into a furnace. At 356 degrees C mercury will evaporate. But at circa 300 degrees C it starts to volatilize, the layer becomes fluid and changes color. This was the moment that the layer would be distributed further and worked in an open furnace. This was very unhealthy of course since mercury fumes are very toxic.
After applying this layer of gold it was still matt and porous. The small holes in the layer could cause oxidation of the bronze below because of the contact with the air. Dirt also could get into these small holes. These holes were closed by worked the surface with a brass brush immersed in beer or vinegar. After this procedure the layer starts to shine somewhat.
Finishing.
The layer of gold then can be finished in different ways that can bring more liveliness and differences in texture.
The layer can be polished by rubbing an agate stone into the same direction over and over. In this way, the layer that would look grainy under a microscope will be smoothed and closed. It will also start to ripple a little like grains of sand in the wind. The minuscule ripples will make the surface shimmer in candle light in stead of just being a flat gold mirror. One can easily spot this rippling when looking across the light.
Matting.
Parts of the surface that didn’t need to shine were matted. Before circa 1780 – 90 that was done by working the surface with a punch making tiny dents that would stop the surface to act like a ‘mirror’. It would leave a gilt but not reflecting surface. Because of the way it was done this matting was fairly rough. After circa 1780 – 90 it was possible to do this with a chemical process. This process is very complex but it worked in the following way. The part that needed to be matted was covered, after gilding, in a emulsion containing gum and carbon. It was put back into the furnace. A very thin layer of gold would evaporate and settle out like water vapor on glass. The result was a very fine matting on a flat, not punched, surface.
Coloring
In the end the gilder could change the hue of the gold. There are no less than six different procedures known, to change the hue of the gold. The example I will give here is to obtain a reddish hue. Before the brushing with a brass brush immersed in beer or vinegar, one had to apply a mixture of yellow wax, bole, verdigris and borax onto the still hot part. After that the part had to be washed off with vinegar. Both the copper from the verdigris and the red clay from the bolus supplied the red pigment.
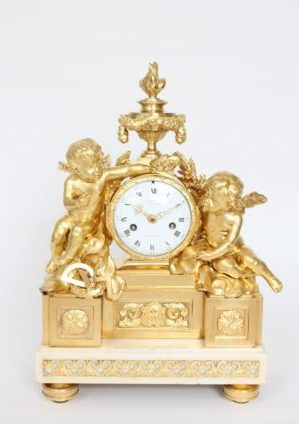
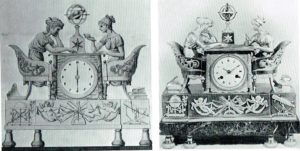
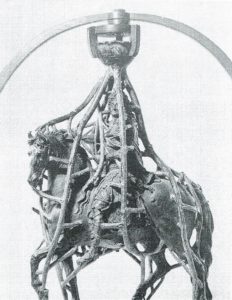
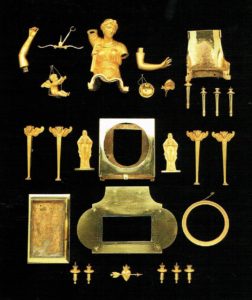 Here we see a French gilt bronze mantel clock in parts. After all the stages of the making of the mantel clock it had to be put together. It was fixed with screws and iron bars keeping all the parts together.
As stated, after all the stages the whole had to be assembled, which was a relative simple job comparing with all the work that went into it before hand.
Finally there are a few remarks regarding fire gilding. After 1840 -’50 fire gilding was only done very sporadically. Very early it was known that the procedure was very unhealthy. There were already in the 18th Century certain measures known to make it less dangerous. We have to take in mind things like better ventilated workshops and furnaces with better air suction. The famous bronzier/doreur Ravrio even donated a large sum of his legacy in the form of a compition, to come up with a more healthy way of doing the process. (1815)
But it was mainly the advent of galvanic gilding which was easier, healthier and above all cheaper, that fire gilding disappeared.
I hope that this article gave some insight into the process of making these fine works of art.
Literatuurlijst;
A.R.J. Pappot, De vuurvergulding in de 18e en 19e eeuw, Bachelorscriptie 2010 Amsterdam.
Ottomeyer en Pröschel, Vergoldete Bronzen deel I en II, München 1986.
Pierre Kjellberg, La Pendule Française, Parijs 1997.
Elke Niehüser, Die französische Bronzeuhr, München 1997
Allix en Bonnert, Carriage clocks, 1974 Woodbridge

